Pricing#
Every time you create or remove a file your account’s storage usage will be updated. This can take some time. If your account’s storage is full you will no longer be able to upload anything to the filesystem.
The Pro subscription has a storage limit of 2 TB. It doesn’t show on the profile page because it’s calculated differently from the other plans, but it is there.
For Prepaid plans the storage is charged at €4 per TB per month. You can view your usage in the transaction log.
Downloads from the filesystem are charged at €1 / TB for prepaid. With Patreon plans there’s a monthly limit. If you turn hotlinking off in the account settings then other people will use their own daily download limit. Otherwise they will use your account’s transfer limit.
Metadata storage cost#
Files and directories stored in the filesystem also use space in the database. To account for this we added an extra rule when counting space usage. All files under 10000 bytes will be rounded up to 10000 bytes. All directories in the filesystem will also use 10000 bytes of storage space. There are a couple of reasons why this rule was put into place:
- Storing metadata like file names and permissions costs space in the database. Database storage is much more expensive than bulk data storage.
- If directories were free to store, you could theoretically store unlimited amounts of data in directory names and not pay for it.
- Accounts with lots of small files and directories slow down database maintenance processes.
- Directories on other filesystems like ext4 also use storage space. Typically that’s 4 KiB, so 10 kB is comparable in that regard.
To put the pricing into perspective: Storing 10 kB on Nova costs €0,00000004. For €1 a month you can store 25 million directories.
Directory sharing#
Files in the filesystem are private by default. Only you can access them
from your own account. Files and directories can be shared by clicking the
Share button in the toolbar while inside the directory, or by clicking the
pencil icon next to the directory in the file viewer.
Shared directories and files will have a shared icon next to them in the file
manager. Clicking that icon will open the shared link. You can also copy the
shared link directly with the Copy link button in the toolbar.
If a shared file gets reported for breaking the content policy your ability to share files from your account may be taken away.
Limits#
Here is a quick overview of the filesystem’s limits:
- Max 10000 files per directory
- Max file size is 100 GB
- File/directory names can be up to 255 bytes long
- Path names can be up to 4095 bytes long
- You can have a maximum of 64 nested directories
- The filesystem does not support hard or symbolic links, this might change later
When traversing a path, Nova requests one directory at a time from the database. This means that filesystem operations will get slower the more nested directories you have. Keep that in mind when organizing your files.
Client integrations#
There are two ways to access your filesystem from outside the web interface.
Rclone#
Nova uses the same filesystem API as pixeldrain, so it works with rclone’s
built-in pixeldrain backend, available since rclone version 1.68. You only
have to point the backend at Nova’s API endpoint instead of pixeldrain’s, see
Configuring the remote below.
You can install rclone from the site. It’s also available in most software repositories. The backend documentation is on the rclone website. Note that it is written for pixeldrain and does not mention Nova, so use the endpoint from our instructions rather than the defaults listed there.
A few example use cases of rclone are:
- Mount Nova as a network drive with rclone mount (instructions below)
- Create a backup of your local storage with rclone sync
- Perform a two-way sync with rclone bisync (bisync is experimental tech, don’t use with important data)
Configuring the remote#
Run rclone config to start the interactive configuration prompt and follow
these steps:
- Press
nto create a new remote. - Enter the name
Nova. This will be the name you use to address the remote in rclone commands. You can choose a different name if you want to. - When asked which storage provider you want to use, enter
pixeldrain. This is correct: Nova uses the same API, so it uses the same rclone backend. - For
api_key, enter an API key from the API keys page. - For
root_folder_id, press enter to accept the defaultme. This is your personal directory. To use a shared directory instead, enter its directory ID here. - When asked
Edit advanced config?, answery. This step is required, the endpoint setting is an advanced option and you will not be asked for it otherwise. - For
api_url, enterhttps://nova.storage/api. The default value points at pixeldrain, so if you skip this your files will end up on the wrong service. - Press enter through the remaining advanced options to accept their defaults, then confirm the new remote.
When you’re done, the remote should look like this in your rclone config file
(rclone config file will tell you where it lives):
[Nova]
type = pixeldrain
api_key = <your API key>
api_url = https://nova.storage/api
You can also set the endpoint per command with the --pixeldrain-api-url flag,
or through the RCLONE_PIXELDRAIN_API_URL environment variable.
To check that the remote works, run rclone lsd Nova: to list the directories
in your filesystem.
Rclone upload performance issue#
Under some circumstances rclone has trouble with reaching full upload speed when
using the HTTP2 protocol (which is enabled by default). This is due to a bug in
the Go runtime. If you are
experiencing this then it might help to add the --disable-http2 flag to your
rclone commands.
Rclone mount systemd service example#
To automatically mount your Nova filesystem when logging in to your Linux OS you can use a systemd user service.
This assumes you have already configured a remote with the name Nova, as
described in Configuring the remote. The name of the
remote will be the name of the network drive as well.
Create a text file with these contents at the path
$HOME/.config/systemd/user/rclone@.service. You may have to create the parent
directories yourself.
[Unit]
Description=rclone: Remote FUSE filesystem for cloud storage config %i
Documentation=man:rclone(1)
After=network-online.target
Wants=network-online.target
AssertPathIsDirectory=%h/%i
StartLimitBurst=5

[Service]
Type=simple
ExecStart=rclone mount \
    --config=%h/.config/rclone/rclone.conf \
    --vfs-cache-mode full \
    --vfs-cache-max-age 720h \
    --vfs-cache-min-free-space 50G \
    --vfs-write-back 10s \
    --dir-cache-time 10m \
    --log-level INFO \
    --transfers 10 \
    --file-perms 0700 \
    --dir-perms 0700 \
    %i: %h/%i

KillSignal=SIGINT
TimeoutStartSec=600
Restart=on-failure

[Install]
WantedBy=default.target
Once the file is in place, reload your systemd config with systemctl --user daemon-reload. Then you can start your network drive with systemctl --user enable rclone@Nova.service --now, where Nova is the name of your
rclone remote (replace with the name of your own remote if necessary). This will
create a directory called Nova in your home which will contain your
network drive. If it doesn’t work, you can check the logs with journalctl --user -u rclone@Nova.
If you can’t get it to work you can always ask for help on our Discord community.
FTPS#
The filesystem also supports FTPS, both anonymously and with an account. The FTP
server is hosted at nova.storage on port 990. The encryption mode used is
Implicit FTP over TLS. Here is an example configuration in FileZilla:
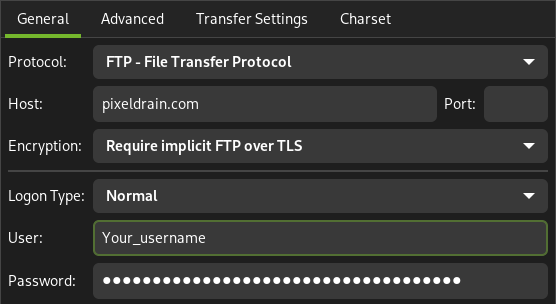
When using FileZilla please make sure you have the “Data transfer mode” set to Binary. If you do not do this FileZilla will corrupt your files if it does not detect the file type correctly. This can happen if you have files without a file extension. Data transfer mode can be found in the Settings screen under Transfers > FTP: File Types. Set to “Binary” to prevent FileZilla from corrupting your data.
There are two different ways to log in to the FTP server:
Read-write personal directory#
To connect to your personal directory you need to enter your account’s username
as username in the FTP client. The password needs to be an API key from the API
keys page. If you connect now you will be able to access your
personal directory (called /me). Here you can upload and download to your
heart’s desire.
Read-only shared directory#
To access a shared directory in read-only mode you need to enter the directory
ID as username in your FTP client. The directory ID can be found at the end of a
shared directory URL. Example: https://nova.storage/d/abcd1234, in this case
abcd1234 is the directory ID. The ID will always be 8 characters long and is
case-sensitive. The password must be left empty.
Filesystem API#
There is a public filesystem REST API, but it is not documented currently. The best reference for how to use the API would be the TypeScript client which the website uses as well. That can be found on GitHub.